Tuesday, July 8, 2008

Their First

PregnantIt is their first child together. They were both pretty excited for this event and asked me to come take some pregnancy photos of her.

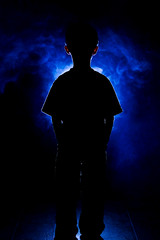
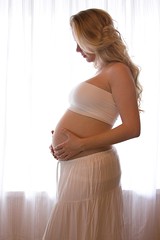
I showed up with camera and speedlights ready to shoot. I saw a big open window and decided to use this for the lighting so we hung a huge sheet over it. The room didn't provide the ambiance I wanted so I decided to make this a backlit photo. This way, she would be the main focus. I asked her to put on some white clothes so her skin would really pop and be the main focal point of the photo. After all, it's her belly we wanted everyone to focus on.

I took a few test shots and immediately knew I'd need some more light. I took out my larger reflector and propped it against the couch to shoot some light back at her. This lit her up beautifully. We were in business.

Pregnant
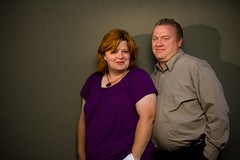
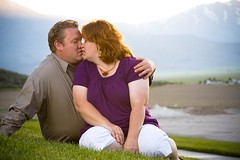
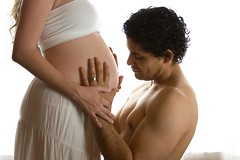
Her husband soon arrived home and we asked him to join her. He was a bit hesitant but after a few minutes of uneasiness, he finally relaxed and we got some great tender moments between him and his soon-to-be child.

Monday, July 7, 2008

Vegas Vacation

Vegas VacationIt was a much needed vacation. Work has been pretty hectic and this have been getting pretty intense, so it was nice to get away for a few days. I took a few days off and took my girlfriend to the relaxing city of Las Vegas. Ya, it's not that relaxing, but it was fun. We got to visit some of her friends and I got to hang out for a few hours at the pool.

We did take my camera to grab a couple of shots of the hotel we were staying in. Yea, that's right, we stayed in the Bellagio! It was super nice. I was so excited because the fountains at Bellagio are my favorite part of Las Vegas. We even had a lake-view room. The shot above was taken from our room. We got to watch the fountains every night during our vacation.

She even indulged my eagerness to take some photos of the fountains. I wanted to get a great photo from the front of Bellagio to get a straight shot. I was worried it was too packed to squeeze in. Lucky, we got there just after one of the fountain shows (they go off every 15 minutes at night). We set up and started shooting during the 3 minute show. I was making adjustments the entire time to get a few different looks throughout the song.

Bellagio at NightI got two photos that I enjoyed. The one above I converted to black and white. I liked the details in this photo and didn't want the color to distract from the water. I liked the fountains in this next photo.

We had a great time and I'm sure we will return, I'm just not sure we'll get to stay in the Bellagio again.

Monday, June 23, 2008

Sunset Antics

Tree ClimberIt was nice to be able to walk across the street and snap some photos. It didn't take a lot of time to set up and he got to have lots of fun, past his bedtime.

We shot this photo during the sunset. Walked across the street, asked him to play in the tree, and got a cool silhouette of him trying to pull himself up. Tells quite the story even if you know how the photo was taken.

We liked it enough to print it and it looks great printed.

Complicated Light

Ze BelgiumA co-worker of mine may be losing his office in the near future. We all may be losing them due to growing needs. It's going to be a sad day when this happens. But to remember the good times, Antoine (pictured) asked me to take a photo of him so he would never forget the good times of having his own office.

He had a chocolate cigar that he wanted to use in the photograph. That immediately got my mind racing with ideas. I knew I wanted to show him in a powerful setting like a crime boss. This is quite the contrast to his real character that I knew it would make a good photo.

Setup shot for 'Ze Belgium'I set up in his office during lunch. I had just bought a new 430ex speedlight that I could use for a hair light so I knew I would be getting my most complicated lighting shot yet. I shot at 1/250 shutter speed at f/3.5. This knocked out any light from the horrible flourescent lights that are in the offices. I used my 580ex II to provide the overall fill light. I set up one 430ex speedlight on the ground and shot it through a plant. This is providing a little texture on the back wall, it was pretty boring otherwise. I then had another 430ex speedlight shot through a snoot and taped this on the book shelf. This was providing my hair light that would help pop him off the background. The last 430ex was shot through a snoot with a CTO (change to orange) gel that would hit his face and provide my key light. The CTO gel helps to add some natural skin tone back to his face and help it pop a bit more as well.

Wow, that was a mouthful. First time I've used 4 lights to photograph anything. When he returned from lunch, he sat down and we were cooking. I had to adjust the one light that was hitting his face since I wasn't sure where it would be when I was setting up. I shot for about 10 minutes and got some great shots. I then pulled back my setup shot then adjusted my white balance to fluorescent to throw the overall color blue. With that CTO gel, it knocked the overall room blue while keeping him quite natural.

I moved in with this new white balance setting just for fun and snapped my last photo. I knew I had some good shots so I didn't play on this mode much. But this last shot ended up being the best. The color just gives it a unique feel and I love how his natural skin tone contrasts with the rest of the photo. Not to mention, his expression looked the most menacing.

Wednesday, June 4, 2008

Learning From Failures

I have come quite a long way since I first started taking pictures as a new hobby. I have learned a lot from websites and books that I've read, but I've learned from a source that I should mention. I have learned quite a bit from my own failures.

This photo is one of my failures. I was practicing this technique. I wanted highlights on the side with a fill light bringing in the rest. I used 3 speedlights for this shot. Two 430ex speedlights set up to the left and right of me. The third 580 ex II was handheld by my girlfriend. She snapped the photo for me as well, I just did all the setup. The 580 ex II triggered the two speedlights wirelessly.

Since it was just practice, I didn't worry too much about the background. I know I wanted to get the sky in the shot, but if I do this photo again, I won't include the power lines or houses in the background. But the background isn't why this photo is a failure for me.

The part I failed on was the lighting. I didn't have the two speedlights to the left & right far enough back. The lights are hitting the front of my face instead of just the sides, causing a very weird and nasty look for my nose. Really, it looks messed up and fat. I also don't like how there isn't much separating my legs from the background. This to me flattens out the image and doesn't define my outline.

So, this certainly taught me some things to watch out for next time. Remember, you can learn a lot from your failures.

Monday, June 2, 2008

Anniversary Take 2

Anniversary Take 2I decided to shoot their anniversary photo from two different locations. This was actually the first I choose. This was taken from the side of their house. I choose this spot because of the continuos color and for the texture of the stucco. I thought it would provide an interesting backdrop for them.

I have tried this technique once before and I LOVED the results. Although, I had only one person in the shot, this time I was dealing with two. I pressed forward and decided to see what we could get, if anything.

I set up one 430ex speedlight right above my camera. I shot this speedlight through an umbrella to get a nice, soft fill light. Then I knocked the exposure of this light down 2 stops. I didn't want this to be the main light - just some fill. I then set up another 430ex camera left to shoot through a snoot. (My own version made from a cardboard box) This would help funnel the light and keep it contained so it only hit their faces and not fill in the rest of the photo.

With the fill light 2 stops underexposed and the key light right on the money, I was taking photos. That's when they started to act natural now that I had things set up. I choose this photo because of the bit of attitude Debbie is showing off. There were some other photos with them laughing and smiling, but this one stood out from the others.

If you have any questions, let me know in the comments. I'll try to answer them best I can.

Sunday, June 1, 2008

The Anniversary

The AnniversaryIt was my sister's anniversary this year with her husband. She asked me to babysit. Okay, she didn't ask, we volunteered. But it was still fun. We got to watch 4 kids and eat pizza. Somehow, we survived.

Since I was going to be coming over, Debbie did ask if I wouldn't mind taking some photos of her and Mike. They haven't had a photo taken of just them for quite awhile. I agreed and thought I would put to use some of the techniques I have learned lately.

For this particular photo, I used two lights. One was a 430ex speedlight camera left shot through an umbrella to soften the light. The other light was the sun. The sun was setting and creating a nice warm light that was just hitting the their hair. I did put a CTO gel on the speedlight to help match the warmth of the sun. The sun put a nice rim light on them while the speedlight filled in from the left.

This was captured during their fun banter between each other. There was a lot of playing around with these two so we have quite a few photos with bunny ears and open-mouth laughing. I did capture this photo and I choose this one to highlight because of the uniqueness to this photo. I like it because the anticipation of the kiss - just enough separation between them to create a highlight and their expressions show how much they care for one another. There is so much emotion spilling from this photo.

Happy Anniversary Debbie & Mike. I hope you enjoy the photos. The bill is in the mail. ;)

Friday, May 2, 2008

Her Favorite Photo

MimicTo continue the "ode to the model", I must to showcase her favorite photo. I took this photo last spring. We went to pick up her little boy from Kindergarten and decided to grab some photos in the playground. We really enjoyed the bright colors the playground had to offer for background elements.

I sat him down on this bench because of the playful handprints. I liked the bright colors and wanted to contrast them with an attitude; I wanted him to pout. I told him to sit on the bench and pout for the camera. He didn't understand. He didn't know how to pout. So, I asked Kirsten to sit on the other side and show him how to pout. My intention was to photograph just him and not get his mom in the shot. She sat down and showed him what it meant to pout.

He cracked up! He thought it was so funny his mom was pouting on the bench. He burst into laughter and I quickly snapped this shot. I knew I was capturing a fun moment between the two of them so I made sure to include them both in the shot.

This has become Kirsten's favorite photo of mine.

I knew I wanted a bit of motion in the shots we had been taking so I had the camera on shutter priority and choose a speed that would allow a bit of motion blur - 1/40 of a second, which you can see in his feet. The camera did the rest. Shot at 85mm, ISO 100, 1/40 of a second at f/10.

I set out to create an image about a boy in trouble on the playground. I thought it would be fun to have such a scorned look on his face with a playful background to contrast the emotion. We never got that shot. But going with the flow, I was able to get a great photo for both of them to enjoy.

Wednesday, April 30, 2008

The Model

In-furred redoneBefore I get too far into this blog, I do need to pay tribute to my lovely model. She has been very supportive of this hobby and continues to help me out learning new things. I am sure she gets sick of me trying to pose her, putting her in weird stances, that never seem to look good. But she stands strong and puts up with my lack of posing skills (something I'm trying to learn how to do at the moment). It's when she throws my posing ideas out the window and takes things her own way with her natural posing that the photos really start to look good.

We took this photo in my kitchen one night playing with her new coat. We wanted to get a photo with some edge along with an alluring look. I think she did awesome at that. I really enjoy the catch light I was able to capture in her right eye. We shot this with an alienbees 800 softboxed camera right and a gridded alienbees 400 to provide the hairlight. Shot at 85mm, ISO 160, 1/30 sec, f/9.

Wednesday, April 23, 2008

Bedtime Story

Bedtime Story 2So, I put my famous (see below) photography skills to use and take some photos for the lovely girlfriend. See, her child can't see so well (like me) and he got his first pair of glasses today. She asked me to capture this special moment. I set out with camera and two speedlights in hand.

I wanted to recreate a photo I saw of a girl reading Harry Potter. (Read this if you haven't, they are great. And if you haven't yet, really? What's your deal?) We all piled into his room and started taking some photos. We put the 430ex speedlight in his lap and I used the 580ex II to trigger it. After a few test shots to make sure things were set up, we started getting some pretty good shots. This photo was one.

Why I chose this photo... I liked how the book covered up a bit of his face and let his eyes tell the story. Since the new glasses were the main focus, this one put all the attention right on them.

USA Today

Green Eyed SunsetI have some extremely exciting news today. I checked out Strobist last night and saw a post talking about an article in USA Today about the Strobist blog. I clicked over to USA Today to read the article. I noticed there were some videos done as well to support the article. I watched to see David Hobby in action. And then, there it was. A photo of MINE! Yes, USA Today used a photo of mine to help showcase some of the photographers that read Strobist.com. I was floored! A photo of mine in USA Today! How many amateurs can claim that. Ya, I had to brag just a little bit. I woke up my girlfriend to show her my photo was used in an article on USA Today.

Read the USA Today article (and don't forget to watch the videos)

So, now that I've had about 3 seconds of fame, so did my girlfriend. The photo was of her!

Wednesday, April 16, 2008

Lunch Break

Lunch BreakI sometimes spend my lunch break studying photography. Whether it be reading online, reading a book I have, or snapping photos, I like to enhance my skills.

This particular lunch break I decided I would try to turn our boring conference room into a photo studio. It's your typical conference room - 4 walls, big white board, long table, and two doors. Nothing special, but certainly a place you wouldn't think you would take a portrait in.

So, I set up one Canon 430EX speedlight camera right with a shoot-thru umbrella. This was going to be my main light. I then set up another Canon 430EX speedlight at the end of the conference table. I got some books to prop the speedlight on and grabbed a plant from a co-worker's office. This is what was going to give me my background. I oriented the speedlight to shoot thru the plant, giving me a nice effect for the background. I then added a gel to give me some color.

I used the E-TTL function of the Canon 40D to fire the flashes. I had the main light in group A and the background in group C. What's nice about E-TTL is that you can set up the speedlights in their correct group and tell the camera what ratio you want to use. It then figures out how hot the flashes need to fire in order to get the proper exposure.

I took this photo, among others, and I was very happy with what turned out. It also helped that my co-worker stepped in to model or you'd be looking at a conference room chair.

Monday, April 14, 2008

Strobist.com

PreparationBefore continuing on, I must pay some small tribute to Strobist.com. I found this site on the web when looking up photography techniques. I didn't realize what I would be getting into when I started reading this blog. I have gone to one of his seminars and was amazed at how simple he made everything look. I can only hope to get his DVD set when it comes out. Hopefully, it won't be too pricey.

The site is awesome. I read it daily, no joke. David Hobby set up this blog to share his knowledge with everyone in the world. It doesn't matter if you're a seasoned photographer or an amateur like me, there is always something new and exciting to read on his blog.

The blog focuses on off-camera lighting. There are tons of tips & tricks he posts about. He also links to various other sites and many cheap tricks that you can do yourself instead of spending tons of money on gear.

Give it a click, you won't be disappointed.

On a personal note, he used this photo of mine in one of his posts. Naturally, it has received the most views of any photo I have. It was awesome to see my photo be used for a blog post on Strobist.com.

Saturday, April 12, 2008

Urban Ruins

Geneva - SmokeStackAfter reading some websites about photography, I stumbled across some that talked about urban ruins. This fascinated me because it meant I wouldn't have to find some ancient ruins to photograph, I could go out in the city I lived in and find some abandoned buildings to photograph. I ventured around and remembered a steel company that had recently shut down. I headed down to the factory and found that even though it had shut down, there was still some activity going on. The furnaces hadn't been turned off but the buildings were still under demolition.

The whole place was wrapped in barbed-wire fences and were very high. I didn't climb any, since there wasn't an easy accessible entrance. So, I shot through the fences late in the evening before the sun had set. I believe it was about 30 minutes before the sun set. I got this photo of one of the non-functioning smoke stacks. I loved the tone of the color. What was amazing to me was the color of the sky. This photo was taken on auto-mode. I didn't know enough to take this photo with manual settings. Everything exposed this way and I like it.

Friday, April 11, 2008

My first gig

RichAlliFlowersI had my camera about a month and my friend approaches me, "Hey Guy, would you be our wedding photographer?" What? Did I hear him correctly? I hadn't had my camera for more than 2 months and he was asking me to photograph his wedding?

The pressure was on from that day, because I agreed. What was I thinking? I set out over the next month learning everything I could and practicing constantly so that when the day came, I could hopefully produce some nice results for them.

The day came and I was sick to my stomach. I remember feeling as if I was going to puke. I was the only photographer there at their wedding. It was all on me whether they would have decent photos to cherish this special occasion for the rest of their lives!

Alli-DancingFeetI pressed forward even with this intense sickness. They day went by in a blur for me. Things happened so fast while I was trying to snap some photos of candid moments. The 3 hour reception felt like 30 minutes for me.

When we pulled up the photos I was amazed to see I had taken a few good photos. They seemed happy with the results. However, I wish they were getting married this month instead of 2 years ago. I know quite a bit more now, that's for sure.

Thursday, April 10, 2008

And so it begins...

RailRoadTracksI wanted to start off this blog to track my own experiences throughout photography. I am an amateur photographer that decided to jump in head-first into this expensive hobby. I bought a Canon Digital Rebel XT for my first SLR and found out that I loved experimenting in photography.

So, my journey has been mostly self taught. I grabbed the camera and played with every setting I could find and read about in the camera's manual. After I got fairly familiar with operation of the camera, I went out and started playing. That's all I did was play, since I really had no idea what I was doing. But I took it one setting at a time. I would let the camera tell me what the correct settings should be in auto mode then I would switch to manual mode, copy the settings, then adjust one thing, like ISO or shutter speed, and watch the effect it would have on the image on the LCD screen.

That's how I started and now have a pretty decent understand of words like aperture, shutter speed, & ISO.

Since then, I have upgraded my camera and now shoot with a Canon 40D. I am very happy with the upgrade as the 40D has proven to be a better fit, even in size. It's a bit larger and fits my hands better than the Rebel.

This is going to be a long photography journey for me. I hope you enjoy the ride.